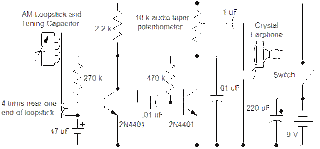
Here is a simple radio that was designed to minimize unusual parts; there isn't even a detector diode! The sensitivity isn't as high as the one-transistor reflex but the simplicity is attractive. Strong stations will provide plenty of volume into a crystal earphone or an external amplifier. The AM Loopstick was purchased on eBay but the enterprising experimenter can swipe one from the interior of a cheap radio. If the loopstick has more than one winding, use the one with the most turns. Wind 3 or 4 turns near one end of the winding as seen in the photo. The tuning capacitor in the prototype is from an old radio and the little plastic dial was cut down such that it just fit into the back of a black pointer knob. The fit was tight so no glue was needed. All of the sections of the capacitor were connected in parallel to get the most capacitance for this loopstick.
All the other parts are common. The transistors can be just about any small-signal type. The prototype uses the metal can 2N2222, primarily for looks. Some transistors may have too much high frequency gain; if the circuit squeals, try adding a small resistor in the emitter of the first transistor, maybe 47 ohms, the smaller the better as long as the circuit is stable. The large 47 uF could be smaller in most cases but the circuit can pick up hum if the wires are too long. Don't leave out the large capacitor across the battery, it provides needed low power supply impedance.
The circuit is built on a piece of 3.8" x 2.7" x 0.5" stained and varnished oak. The terminals are copper-plated nails used for weatherstripping. These nails are commonly available in home improvement stores and are also available in brass which is also solderable. Predrill the holes to make nailing easier and use a nail set or larger nail turned upside-down to make it easier to hit only the desired nail. The loopstick is held in position by an ordinary nylon cable clamp and the battery is mounted in a spring holder. The front panel is aluminum that was polished to a nice shine. First sand off all scratches with fine sandpaper. Then remove the sanding marks with ordinary kitchen steel wool. Now polish the surface with the finest steel wool in the paint department, usually "000". Then, for the real shine, polish the surface with a polishing compound like rouge. By the way, those paper-wrapped sticks of polishing compound are easily dissolved by lighter fluid (naphtha). Just put a few drops on a tissue and rub it on the end of the stick to load the tissue with compound. These polishing steps go quickly and you can have a mirror finish in a couple of minutes.
The front panel has a couple of scales for the tuning and volume printed on high gloss report cover stock and sprayed with a protective clear spray. The feet on the bottom are recessed in the oak using a forstner bit. The corners on the aluminum and oak were rounded on a belt sander.
skip to main |
skip to sidebar
audio, Video, Digital, Power Amplifier,Power Supply, Instrument, Misc
02 October, 2007
Simple Two-Transistor Radio
Posted by
dewadana
at
10:45 PM
![]()
Labels: Analog, transistor
Subscribe to:
Post Comments (Atom)
Circuits Archive
Catagory
- 555 (6)
- AC (1)
- AC Power Control Circuits (2)
- AC to DC Converters (8)
- Alarms and Indicator (17)
- amplifier (13)
- Analog (34)
- audio (14)
- cmos (4)
- cristal (5)
- DC (1)
- delay (2)
- digital (2)
- diode (1)
- flip-flop (4)
- LED Circuits (10)
- meter (4)
- misc (9)
- mosfet (2)
- op-amp (7)
- PC Circuits (2)
- Power Circuits (6)
- Power Supply (5)
- Relay Circuits (7)
- RF Circuits (3)
- SCR (1)
- sensor (1)
- Telephone Circuits (3)
- transistor (5)
- wave (1)

No comments:
Post a Comment